Build your course
Branding
Set your brand name, color, look, logo, favicon, share image, footer and course covers, and control the "Course hosting by Bitty Course" credit.
Your course site, the video player and the emails students get carry your brand. Branding is set once for the whole workspace in Settings → Brand and Settings → Course site; the only per-course image is the course cover. Only owners can change branding; editors see the same pages with the fields disabled.
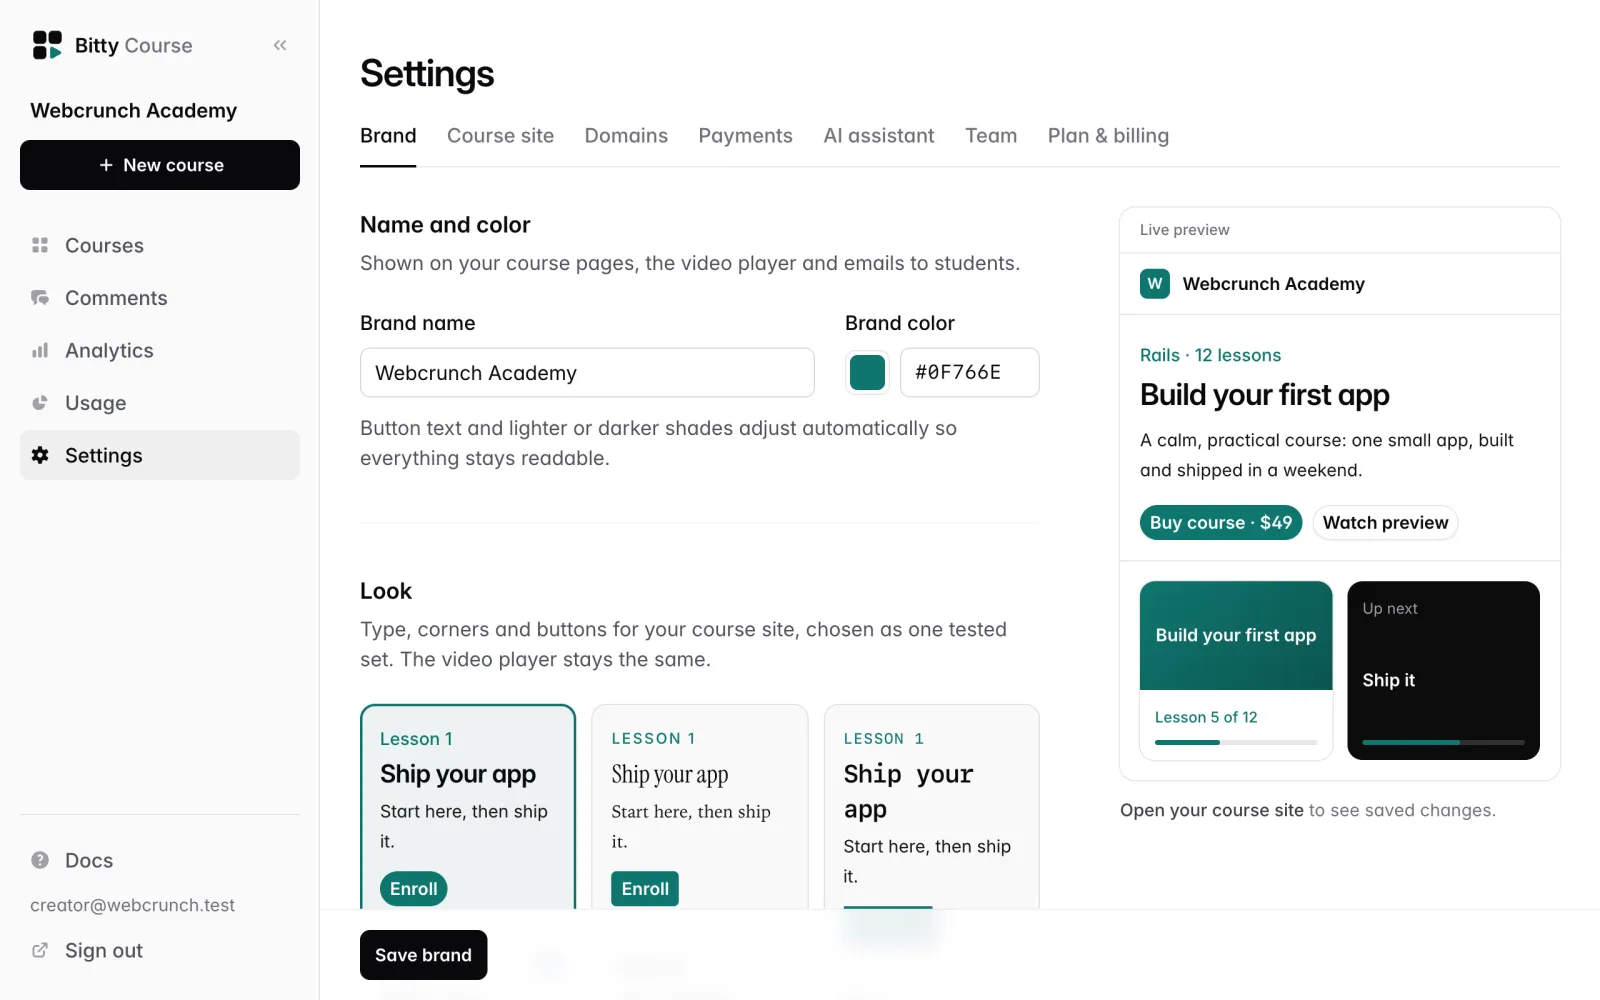
Name and color
- Go to Settings → Brand.
- Under Name and color, set:
- Brand name (required, up to 80 characters). Shown on your course pages, the video player and emails to students, and in the browser tab.
- Brand color. Use the color picker or type a hex value like
#4f46e5.
- Click Save brand.
You only pick one color. Bitty Course works out the rest so everything stays readable:
- Buttons use your color as chosen, with black or white text, whichever reads better.
- Links and small text on white use a darker shade if your color is too light. The page tells you, for example "Links and small text use a darker shade (#...) so they're readable on white."
- Accents on the dark video player use a lighter shade if your color is too dark: "On the dark video player, accents use a lighter shade (#...)."
The preview beside the form updates as you type. "You have unsaved changes." shows until you save.
Look
Under Look, choose one of three tested sets of type, corners and buttons:
| Look | Style |
|---|---|
| Modern | Clean sans-serif type, rounded corners and pill buttons |
| Editorial | Serif headings and reading text, like a well-set newsletter |
| Mono | Monospace type, square corners and hard-edged buttons |
The look applies to your course site. The video player stays the same. There are no separate font or corner pickers.
Logo and favicon
Under Logo and favicon, click Upload (or Replace) for each. Tick Remove to take one off, then save.
| Image | Where it shows | Requirements |
|---|---|---|
| Logo | The course site header, the lesson page's top bar, and the top of student emails | PNG, JPEG or WebP, up to 1 MB. Wide logos around 250 × 60 work best. |
| Favicon | Browser tabs on your course site | A square PNG, at least 64 × 64, up to 200 KB |
Without a logo, the header shows the first letter of your brand name on your brand color. Without a favicon, your initial is used. SVG and GIF files aren't accepted.
Course covers
Each course has its own cover, used on the course list, the course page and in link previews.
- Open the course and click the Details tab.
- Under Basics, upload a Cover image.
- Save the course.
Use a 16:9 image at least 1280 × 720, PNG, JPEG or WebP, up to 5 MB. Without one, a cover is made from your brand color and the course's first letter. An AI assistant can also set it with the set_course_cover tool. See Courses.
Link previews
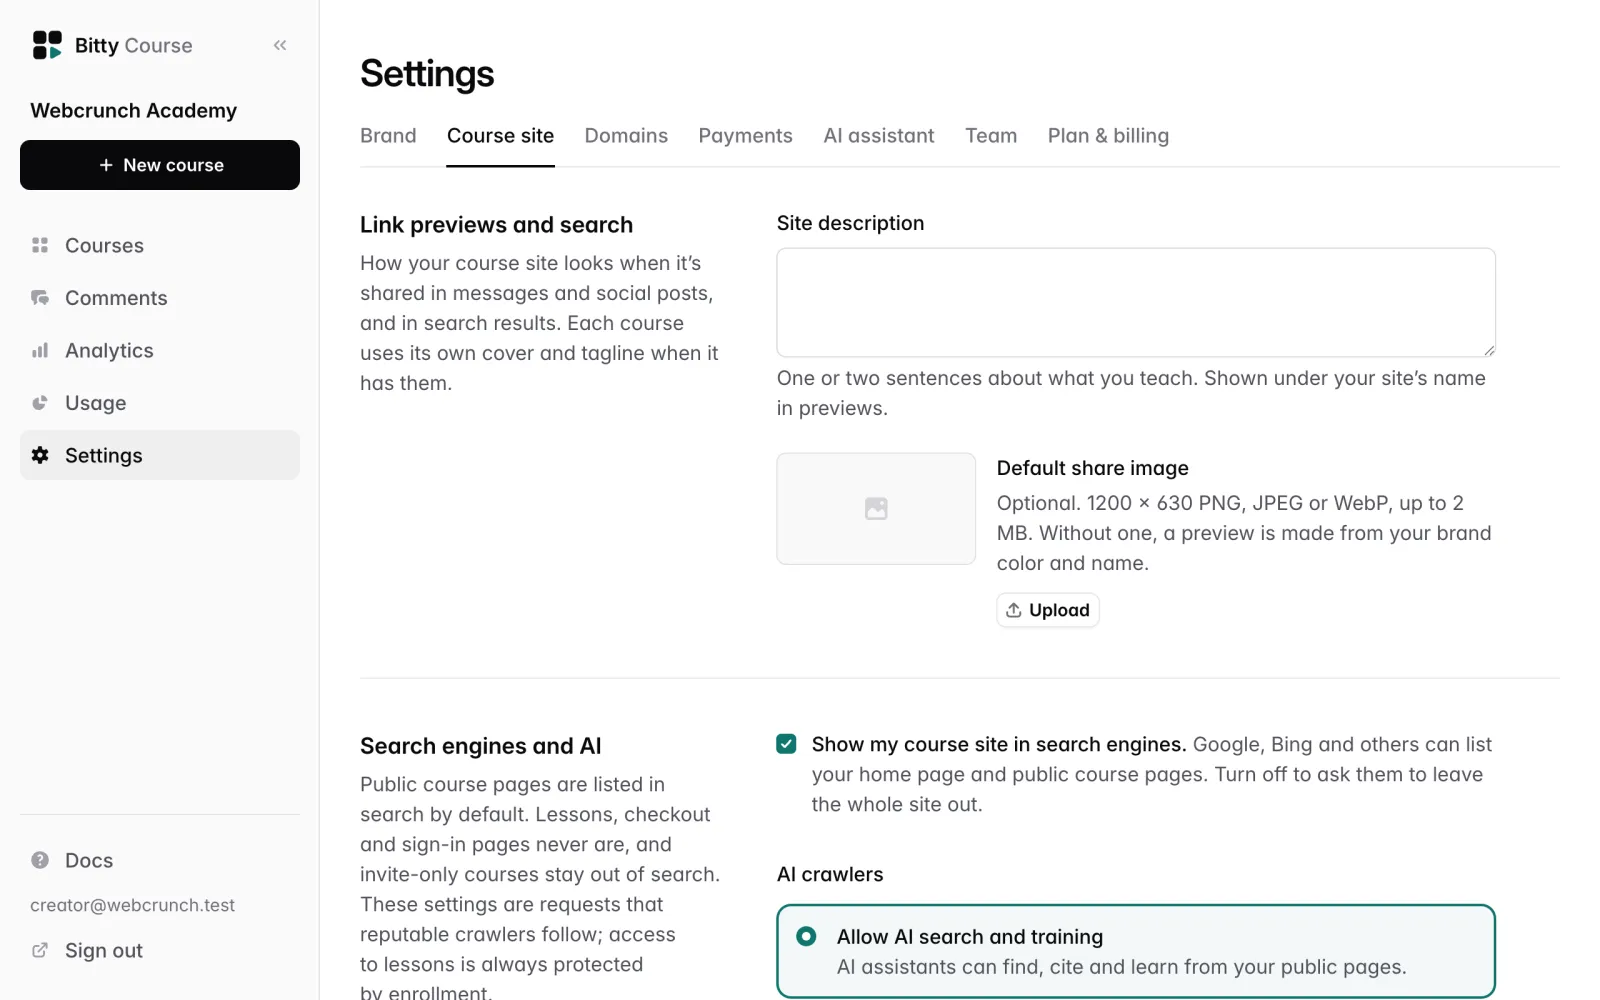
In Settings → Course site → Link previews and search:
- Site description: one or two sentences about what you teach, up to 300 characters. Shown under your site's name when your course site is shared.
- Default share image: optional, 1200 × 630, PNG, JPEG or WebP, up to 2 MB. Without one, a preview image is made from your brand color and name.
Each course uses its own cover and tagline in previews when it has them.
The same section has the search engine and AI crawler settings. See Courses for hiding a single course from search.
Footer and contact details
In Settings → Course site → Footer:
- Footer note: one short line of plain text, up to 200 characters.
- Support email: shown as a Contact link in the footer. Emails to students also use it as their reply-to address.
- Website, YouTube, X, Instagram and LinkedIn links. The social links must point to those sites. You can leave off
https://.
Click Save course site.
The "Course hosting by Bitty Course" credit
A small credit appears in your course site footer ("© [year] [your name] · Course hosting by Bitty Course") and at the bottom of emails to students.
- On the Free plan the credit is included and can't be turned off. The setting is shown ticked and disabled.
- On Starter and Plus, untick Show "Course hosting by Bitty Course" in Settings → Course site → Footer to remove it. Turn it back on any time.
See Plans and usage.
Where your brand shows
- Course site: header, footer, buttons, links, progress bars, covers and the look.
- Video player and lesson pages: your logo and accent color on the dark top bar and player.
- Sign-in pages on your course site: your name and colors.
- Emails to students (sign-in codes, course access, password resets): sent as "[your name] via Bitty Course", with your logo or initial, your color, and your support email in the footer.
Emails to you and your team (invitations, domain status, usage warnings, weekly summaries) stay Bitty Course-branded.
Good to know
- Branding is per workspace. Courses can't have their own colors, logos or looks; only the cover and text differ per course. For a completely separate brand, create another workspace from the workspace menu in the studio sidebar.
- To check saved changes on the live site, click Open your course site under the preview.
- Your hosted address is fixed when the workspace is created. To use your own domain, see Custom domains.
- While the workspace is read-only after canceling, branding can't be changed.