Start here
Getting started
Create a workspace, build your first course from your videos, set a price, preview it and publish one shareable link.
Bitty Course hosts video courses for solo creators. This page walks you from sign-up to a published course link. Each step links to a page with the full details.
1. Create your workspace
A workspace holds your courses, students and brand.
To create one:
- Open the sign-up page (Start a workspace on the sign-in screen).
- Fill in Your name, Email, Workspace or brand name and Course address.
- Tick I agree to the Terms of Service and the Creator Agreement (links to the Terms, Creator Agreement and Privacy Policy open in a new tab). You can't create a workspace without it.
- Click Create workspace.
- Enter the 6-digit Sign-in code Bitty Course emails you. It expires in 15 minutes. You can also use the link in the email.
There is no password. You sign in with an emailed code each time (see Signing in).
The Course address becomes your hosted address: the subdomain where your course site lives. It may contain lowercase letters, numbers and hyphens, up to 63 characters. It must not already be taken, and a few names are reserved. There is no setting to change it after the workspace is created, so pick it with care. On a paid plan you can connect your own domain later (see Custom domains). You can rename the workspace any time with Brand name in Settings → Brand.
Already have a workspace and want a second one? Open the workspace menu at the top of the sidebar and choose New workspace. An account that only has courses as a student can't start a workspace while creator sign-up is closed.
2. Create your first course
- Click New course in the sidebar (or Create your first course if you have none yet).
- Type a title in What are you teaching? You can leave it blank and name the course later; it is then called "Untitled course".
- Drag your video files onto the page, or click Choose videos.
Each video becomes a lesson, in file-name order (for example "1 Intro", "2 Setup", "10 Wrap up"). Lesson titles come from the file names, which you can edit later. The course is created as a private draft, and you land on its page while the uploads continue.
Prefer to fill in details before uploading? Click Start with a blank course on the same screen. Want an AI assistant to plan and build the course? Use the prompt in Or let your AI assistant build it (see MCP server).
New courses start as Paid at 49.00 USD. You can change this before publishing (step 5).
3. Add videos
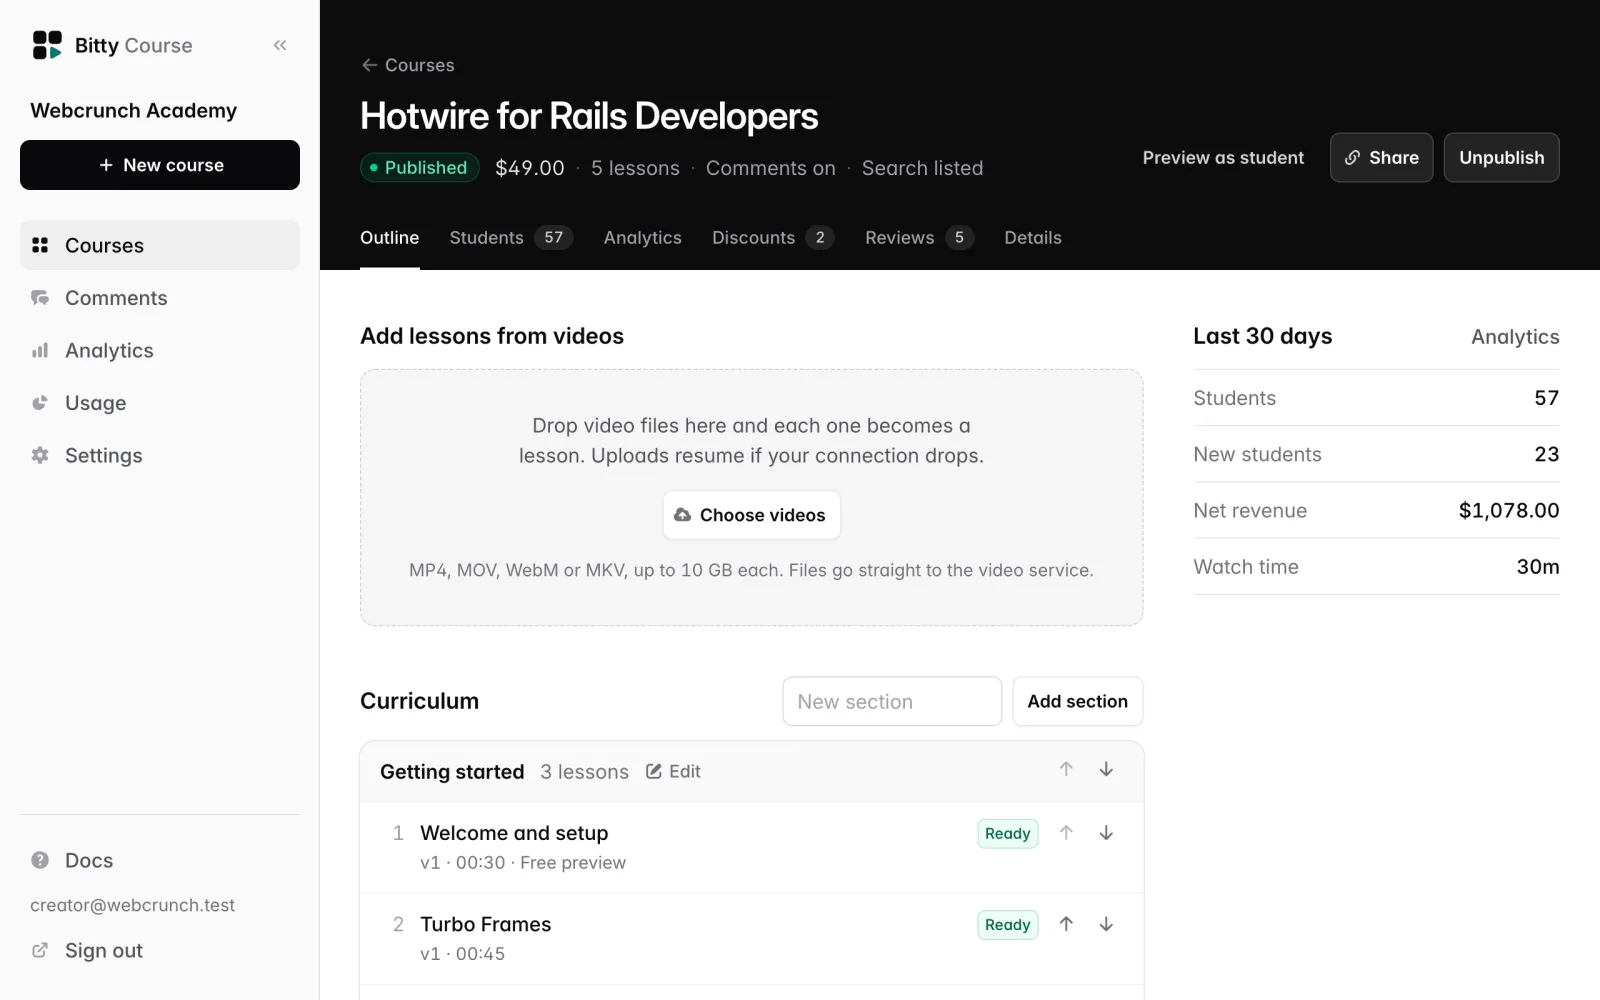
On the course's Outline tab, use Add lessons from videos: drop files or click Choose videos. Each file becomes a new lesson at the end of the last section.
- Supported formats: MP4, MOV, WebM or MKV, up to 10 GB per file.
- Uploads resume if your connection drops.
- A lesson's first video goes live by itself once processing finishes.
- Uploads in progress, and any that failed, are listed under Processing and problems.
To make a lesson with no upload, click Add a lesson without uploading under any section. To add a quiz, click Add a quiz.
Details: Uploading video, Sections and lessons, Quizzes.
4. Arrange your curriculum
Under Curriculum on the Outline tab:
- Add a section: type a name in New section and click Add section.
- Reorder sections and lessons: drag them by the grip handle, or use the up and down arrows. You can drag a lesson into another section.
- Rename a section: click Rename next to its title.
- Edit a lesson: click its title to open the lesson editor, where you add notes, attachments, captions and more.
See Sections and lessons.
5. Set price and access
Open the course's Details tab. Under Access, choose Who can watch:
- Paid: students buy access. Set Price (at least 1.00) and Currency (USD, EUR, GBP, CAD or AUD). Selling needs Stripe connected in Settings → Payments.
- Free: students sign up to enroll.
- Invite only: you add students yourself.
Click Save course. See Pricing and access and Getting paid.
To let anyone try a lesson before buying, tick Free preview in that lesson's editor.
6. Preview as a student
Click Preview as student at the top of the course page. You see the course page and lessons with your brand, exactly as students will, including draft lessons. Buy and enroll buttons are disabled, and only your team can open the preview.
7. Publish
The Before you publish card on the course page lists anything that blocks publishing, for example:
- Add at least one lesson.
- A lesson needs a ready video, or must be marked as a text-only lesson.
- A quiz needs to be published.
- A paid course needs a price of at least 1.00 and Stripe connected.
- Your plan's published-course limit is reached (the Free plan includes one published course).
When the list is clear, click Publish. See Courses.
8. Share your link
Click Share on the course page and copy the Course link. It stays the same as you edit lessons and replace videos.
The link never grants access by itself. Students still buy, enroll or get invited, depending on the course's access mode. For a paid course, the Share dialog also lists ready-made links with a coupon applied (see Coupons and sales).
Next steps
- Branding: logo, colors and your course site.
- Captions and translations and Chapters.
- Students: invite, import from another platform, view progress and manage access.
- Emailing students: send an announcement to everyone in a course.
- Release a section over time: open lessons week by week.
- Certificates and reviews: optional, per course.
- Two-step sign-in: protect your account with an authenticator app.
- Plans and usage: storage, viewing hours and limits per plan.