Students
Students
The course Students tab and student pages, giving and removing access, progress, quiz results and exactly what you can see about each student.
Every course has a Students tab listing everyone who has access, how far they've got and when they were last active. From there you can add people by email, remove or restore access, and open any student to see their lesson-by-lesson progress and quiz attempts.
Open the Students tab
- In the studio, open Courses and choose a course.
- Click the Students tab (next to Outline, Analytics, Discounts and Details). The tab shows a count of students with active access.
The top of the page says how many students have access and how many have finished, for example "12 students with access, 3 finished."
The student list
Each row shows:
- The student's name (or email, if they haven't given a name) and their email.
- How they joined, when, and what they paid if there's an order. How they joined is one of Purchase, Coupon, Free, Invite or Manual (see below).
- A progress bar with lessons completed out of total lessons. It turns green when they've completed every lesson.
- When they were last active, or Not started.
- A Revoked badge if their access was removed.
The list shows 50 students per page, with Previous and Next links.
Filter, search and sort
Filters across the top, each with a count:
| Filter | Who it shows |
|---|---|
| Everyone | All students, including those whose access was removed |
| Not started | Active access, no progress or quiz attempts yet |
| In progress | Active access, started but not every lesson completed |
| Completed | Active access, every lesson completed |
| Inactive 30+ days | Active access, started, not finished, and last active more than 30 days ago |
| Access removed | Students whose access was removed (by you, or by a refund) |
Search by name or email narrows the list as you type. Sort offers Newest (the default), Last active, Most progress and Name (students without a name come last).
"Last active" is the most recent of their saved video progress, a lesson completion change, or a quiz submission.
How students join
| Label | Meaning |
|---|---|
| Purchase | Bought the course through checkout |
| Coupon | Got in with a coupon that made the course free |
| Free | Enrolled themselves in a free course |
| Invite | You added them to an invite-only course |
| Manual | You added them to a free or paid course (complimentary access on a paid course) |
Recent checkouts
The side panel lists the course's last 10 checkouts with the buyer, amount and status (for example Paid, Pending or Refunded). A pending checkout is one the student started but hasn't finished, or that is still waiting for Stripe to confirm it.
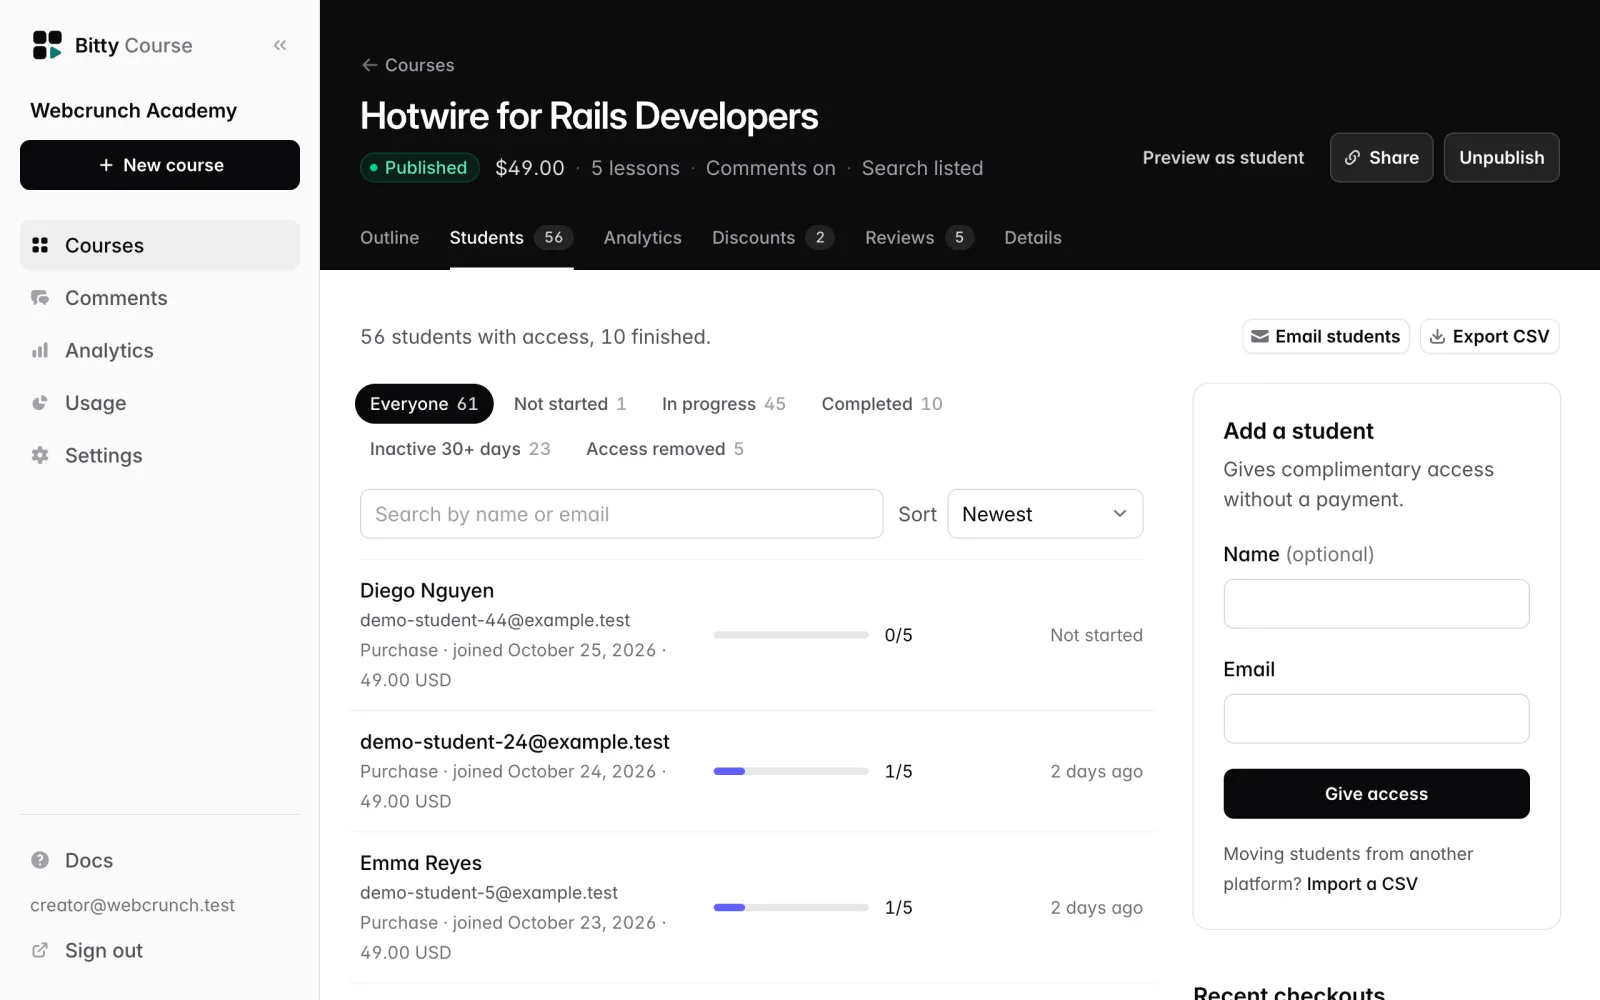
Add a student
To give someone access without a payment:
- On the Students tab, find Add a student.
- Enter their Email and, optionally, a Name (up to 80 characters).
- Click Give access.
What happens next:
- They're enrolled right away and emailed "You have access to [course]", sent with your brand name.
- If they don't have a Bitty Course account yet, the email has a sign-in link that expires in 7 days and works once. After that they sign in on your course site with an emailed code.
- If they already have an account, the email links straight to the course.
- On a paid course this is complimentary access: no order is created and nothing is charged.
- The name you enter is only used if the student doesn't already have one. It never overwrites a name the student chose.
- If the student previously had access removed, adding them again restores it.
This is the only way students get into an Invite only course.
The student can only open the course once it's published. If you add someone to a draft course, they're added straight away but their email waits: it's sent when you publish the course.
Add a student is hidden when the workspace is read-only after canceling.
Import students from a CSV
For students who bought your course somewhere else. Owners only.
- On the Students tab, under Add a student, click Import a CSV.
- Choose a CSV file and click Preview import. Each row is an email address, then optionally a name. A header row with an "email" column (and "name") also works, so most platforms' exports can be used as they are. Up to 2,000 rows and 1 MB.
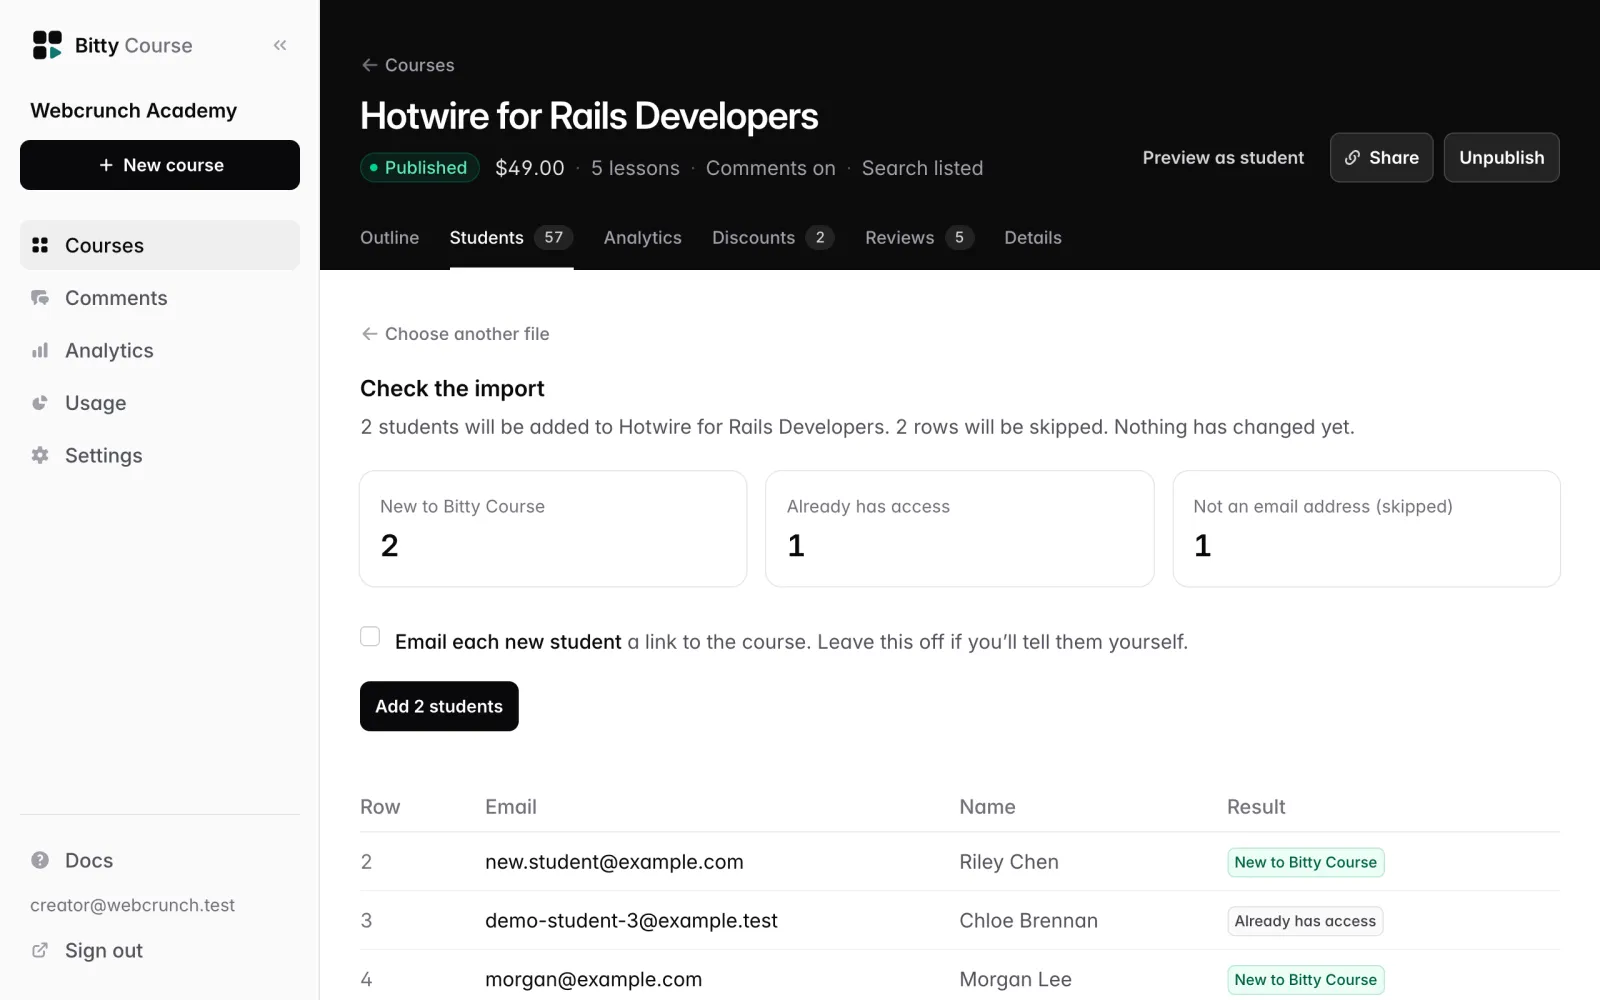
- Check the preview. Nothing has changed yet. Each row shows what will happen:
- New to Bitty Course and Has an account: will be added.
- Already has access: skipped. Their existing access, including a purchase, is left as it is.
- Access was removed (skipped): an import never restores someone you removed. Use Restore access on their page instead.
- Repeated in the file and Not an email address: skipped.
- Optionally tick Email each new student a link to the course. It's off by default, for when you'll tell them yourself. On an unpublished course the email waits until you publish.
- Click Add N students.
Imported students get access without a payment, and their source shows as Import. Only import people you have a right to add, such as your existing customers.
The student page
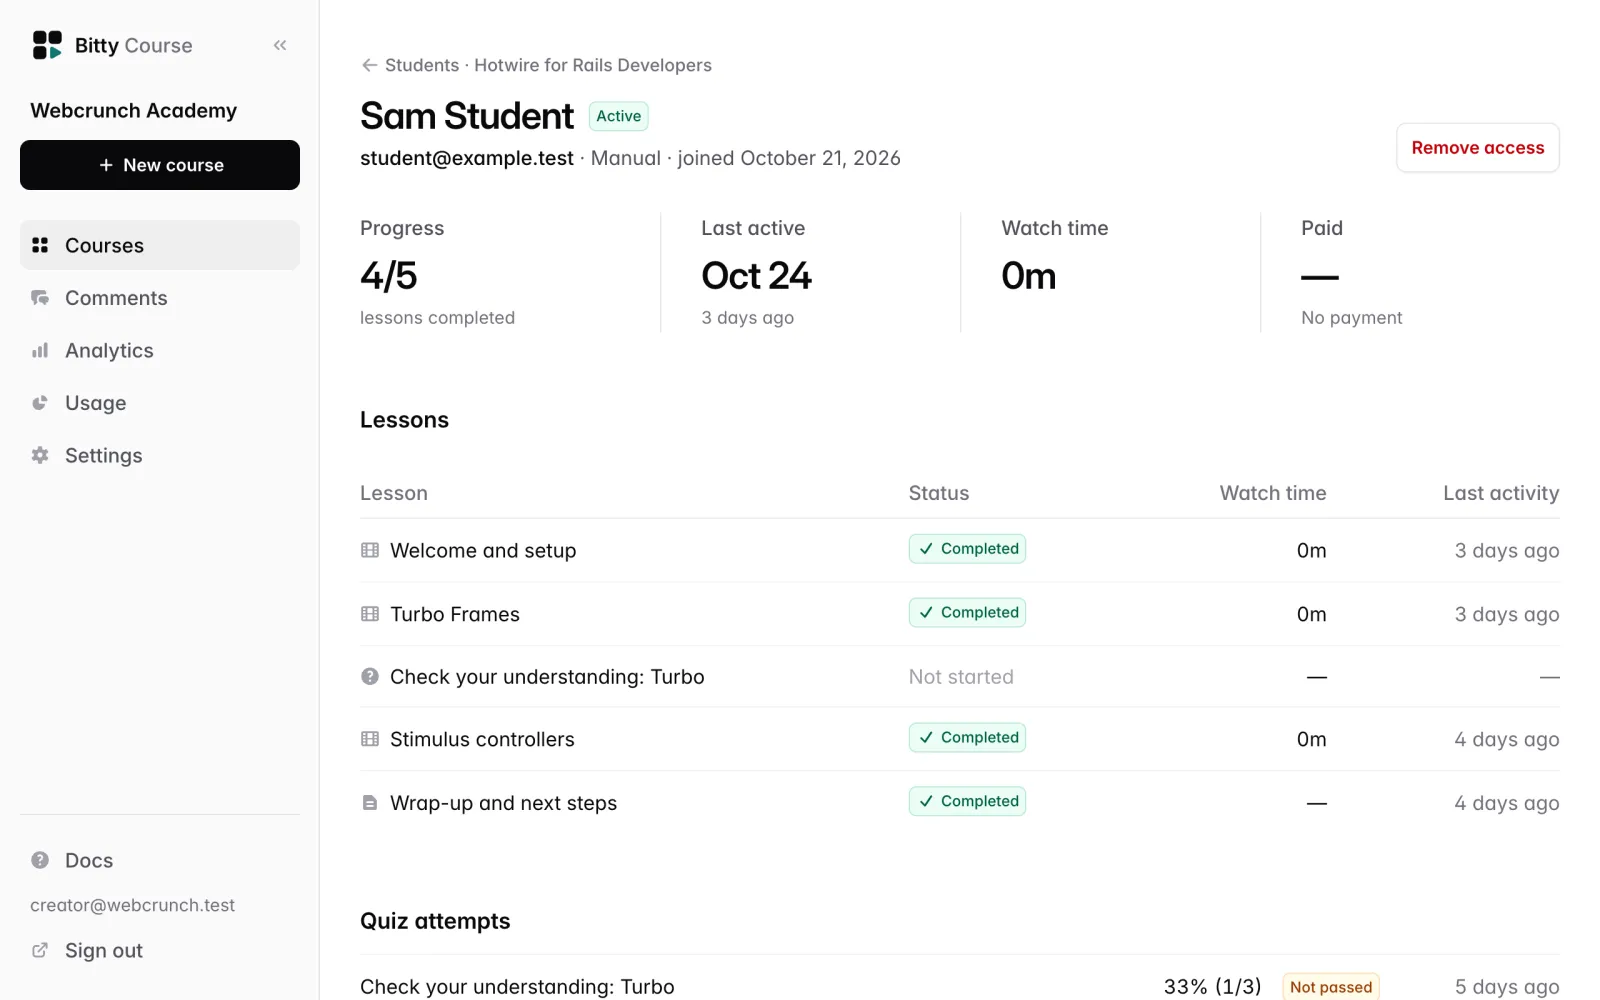
Click a student's name to open their page. It shows:
- Name, email, how they joined and when. If access was removed, the reason ("Removed by the creator" or "Refunded") and the date.
- Progress: lessons completed out of total.
- Last active: date and how long ago.
- Watch time: total video they've played in this course.
- Paid: the amount and its status and date, or "No payment".
- Lessons: every lesson with its status (Completed, Stopped at a timestamp, or Not started), watch time for video lessons, and last activity.
- Quiz attempts: their 20 most recent attempts, each with the quiz name, score (for example "80% (4/5)"), Passed or Not passed, and when. Shown only if they've taken a quiz.
- Checkouts: every checkout they started for this course, shown when there's more than one or one didn't complete.
Remove access
- Open the student's page.
- Click Remove access and confirm.
Their enrollment is marked as removed straight away. They can no longer open lessons, download attachments or read and post comments. A video that is already playing can keep playing for up to 5 minutes, because each playback link the player receives is valid for 5 minutes.
Removing access:
- Doesn't refund anything. Owners can refund separately (see below).
- Doesn't email the student.
- Keeps their progress and quiz history, so restoring access picks up where they left off.
- Stops them buying the course again or re-enrolling in a free course. They're told to contact you.
Restore access
On the page of a student whose access was removed, click Restore access. Their access, progress and quiz history come back.
Refund a purchase
Workspace owners see a Refund button on the page of a student who still has access through a paid order. Refunding a purchase also ends that student's access once Stripe confirms the refund. Editors don't see the button. See Refunds for the full flow.
Email your students
Click Email students at the top of the Students tab to send everyone with access an announcement. See Emailing students.
Export students as CSV
Owners can click Export CSV at the top of the Students tab. Editors don’t see the button, because the file lists students’ email addresses. The file uses the filter, sort and search you have selected, so to export everyone, choose Everyone and clear the search first.
Columns: Name, Email, Access (active or revoked), How they joined, Joined (UTC), Lessons completed, Lessons, Progress %, Last active (UTC), Minutes watched, Paid, Currency, Order status.
Cells that start with =, +, - or @ get a leading ' so spreadsheet apps don't run them as formulas.
What you can see about students
The studio shows a student's:
- name and email address
- how and when they joined, and whether they still have access
- order amounts, status and dates for this course
- per-lesson completion, the position where they stopped, and watch time
- quiz attempts with scores and pass or fail
- when they were last active
- the questions and comments they post on lessons (see Comments)
That's all the studio shows. Students' passwords are never visible to you, and the studio shows no IP addresses or device details for students. You see a student only in the courses they're enrolled in. A student's progress in another creator's courses is never shown to you.
Who can do what
| Action | Owner | Editor |
|---|---|---|
| View students, progress and quiz attempts | Yes | Yes |
| Export CSV | Yes | No |
| Add a student | Yes | Yes |
| Remove or restore access | Yes | Yes |
| Refund | Yes | No |
See Team for roles.
Good to know
- Progress counts every lesson in the course, including quizzes and text lessons. Adding lessons lowers everyone's percentage until they complete the new ones.
- A video lesson is completed automatically once the student has watched 90% of the current video, or when they click Mark complete. A quiz lesson is completed when they pass it.
- Team members (owners and editors) can watch every lesson without an enrollment, so they don't appear in the student list unless someone enrolled them.
- For numbers across all students, such as completion by lesson and where viewers stop watching, use the course's Analytics tab. See Analytics.